
Hobie Rudder Cams
- Posted on
- Posted in sailing
CAMS:
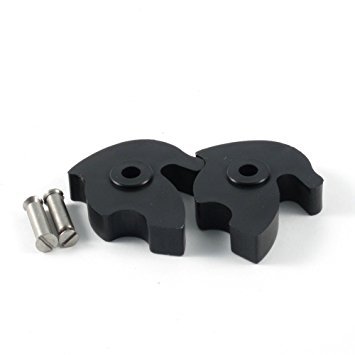
The Hobie rudder cam system is pretty easy to deal with if you keep it greased. Use marine grease, if possible, between the cam and plunger. Anything will do as a temp lubrication: Suntan lotion, WD-40 or Chap Stick etc. Marine or bearing grease just stays there longer. Lubricating the system will prevent damage to the cam and plunger that is caused when the cam gets stuck in the down position.
A tight fit is required between the upper arm and cam (lower casting) when the rudder is locked down. The rudder should be held firmly against the lower casting. Any rudder movement, aft from the casting, indicates a miss-adjustment that can allow the upper arm to disengage from the cam without forcing it to rotate into the open (unlocked) position.
If the cam sticks in the down position there are several methods to get it to rotate release. From above and forward of the assembly, lift the upper arm and rotate it aft and out of the way. Loop a line around the cam… yank the line to pop the cam open. You can also use the tiller arm to assist this technique by wrapping the line around the cam, then lowering the tiller arm and wrapping the line a few times around the tiller arm. Pull up on the tiller arm which (through the line) levers the cam open. There are several tools that can also be used. I use a large blade screwdriver that can be inserted into the side of the cam to leverage it open. There is also a tool (Hobie Part # HC 83103) that has a small hook that can be used (by drilling a small hole in the cam to allow it to be inserted) for leverage. You can also use a small flat blade screw driver to work between the cam and plunger... force the plunger down to unlock the cam. I find that this works very well even if the cams are dry and un-lubricated.
If the cam is really stuck down, the only tool needed is a small blade screwdriver. You work the blade between the cam and plunger to force the plunger down and release the cam. Don't bother with the big screw under the spring they often are fused in place and the spring does not need to be adjusted but a few times in the life of the boat.
If the cam keeps getting stuck down, even when greased, there is a miss adjustment in the upper casting plate (newer boats), the rudder is drilled wrong causing too much play in the system or it is worn out (too flexible) where it hooks the upper casting.
A cam plate too far forward can keep the cam from fully locking. A cam plate too far aft will allow the rudder to slip aft in the lower casting or allow the upper casting to be raised without pulling the cam open. To adjust the upper plate, lock the rudder down and hold the rudder firmly against the lower casting (forward most position). Loosen the upper plate then back it away from the cam a little. You want to seat the plate tight against the cam (in the fully locked position) while holding the rudder forward in the lower casting. Ease the plate forward while wiggling the upper arm up and down just a bit. The idea is to find the point of deepest insert that the upper plate can get into the cam. That may mean that the upper casting is not touching the lower casting. Don't force the plate too far forward as this will begin to force the cam open. When tightening the plate, be sure the plate doesn't move. I usually tighten with the wrench handle rotating forward towards the cam to move the plate forward if anything.
RUDDER RAKE:
Rudder rake (forward or aft in the lower casting) changes the helm feel. Weather helm (pull on the tiller) is caused by the rudder being aft of neutral. Lee helm is caused by the rudder rake being too far forward. Best adjustment is to have slight weather helm on all sailing angles. This allows you to hold the tiller against a slight pull for holding the boat on a stable course. The boat should round up slowly if you drop the tiller. Lee helm is dangerous and can cause you to loose control of the boat. Neutral helm can be difficult as the tiller is pulling and or pushing against you on different sailing angles and can cause you to have erratic steering.
On older boats, rudder rake is adjusted by re-drilling the rudder blade. Either the upper casting hole or possibly both. Newer boats use the upper casting plate (see adjustment under "CAMS" above) and set screw in the lower casting for rake adjustments. There is a basic rudder rake setting to compare to. You can also use a drilling template - Click Here
For proper rake adjustment you may need to try several settings. Helm feel will change with different mast rake, sailing angles and sail settings.
Start off with the rudders in the locked down position. Measure down the blade 12” from the bottom of the lower casting. Mark the rudder with a line 2” long perpendicular to the 12” point. Using a very thin piece of line, starting at the top of the rudder pin, align the "line" with the rudder pin top to bottom (on the pins center line / axis) and check where the line intersects the mark on the rudder. Mark the point where your rudder pin axis crosses the mark you made 12" down the blade. Measure in from the front of the rudder. A larger measurement means that the rudder is raked forward more. More forward rake is less weather helm. Optimally, you should have 1 5/8” to 1 3/4” for a measurement. To achieve the 1 3/4” number, you might have to re-drill the front hole on the rudder or file away at the front of the rudder where it hits the casting. To much forward rake can cause lee helm and THAT is WORSE and even dangerous. The boats sail better and are safer if the boat rounds up slowly when the tiller is released.
You can use the above technique to measure and re-drill a blade. Mount the blade on the lower casting. Make all of the above measurements and set (and hold) the rudder in the desired rudder rake position. Lock the upper casting onto the rudder and lower casting. Push the upper assembly up into the cam to seat it tightly (that holds the rudder in the raked position once the rudder system is fully set up). Align the tiller arm angle (vertical position) with the rudder assembly on the opposite side of the boat. You can mark the bolt hole position or drill right through using the casting as a drill guide. You must hold the upper arm in position while drilling this way. I angle the drill slightly forward rather than straight through. This forces the upper casting forward more as the drill reaches the opposite side of the casting after going through the rudder blade. If the hole is too far aft, the rudder will slip aft a bit when under sailing loads.
RUDDER ALIGNMENT:
Check rudder alignment in the direction of travel. Proper rudder alignment would be 1/8" to 1/4" toe-in on a 14 or 16. This is measured with the rudders down. Measure leading edge to leading edge and then trailing edge to trailing edge. The front (toe) should be closer together than the trailing edge. Measure at about the little hump on the leading edge and straight back from there for the trailing edge. It is always possible that the rudders are actually mounted on the reverse hulls. That causes extreme toe-in problems. Look at the upper casting / arms to be sure they angle in towards the boat's centerline when the rudders are in alignment with the hulls.